
 •
• 
A key element of every security system is its ease of use. One of Curiefense’s core principles (as discussed in the Manifesto) is simplicity:
Simplicity is a vital ingredient in security. Complex systems tend to be abandoned, and complicated processes tend to be avoided. Even worse, a complicated system can be misconfigured, leading to an illusion of security when in fact there are vulnerabilities.
Our goal is to keep Curiefense effective and simple to use, whether it is an API call, UI interaction, automation procedure, or a foundational concept. Simplicity boosts participation and promotes action. We will always choose to work harder to keep it as simple as possible, regardless of the complexity beneath the surface.
Simplicity does not imply a lack of sophistication. On the contrary, Curiefense is designed to provide security powerful enough to handle threats (not only today’s, but also tomorrow’s), while still remaining understandable and straightforward to use.
In this article, we’ll discuss a high-level overview of Curiefense’s traffic filtering. We’ll start with this diagram:
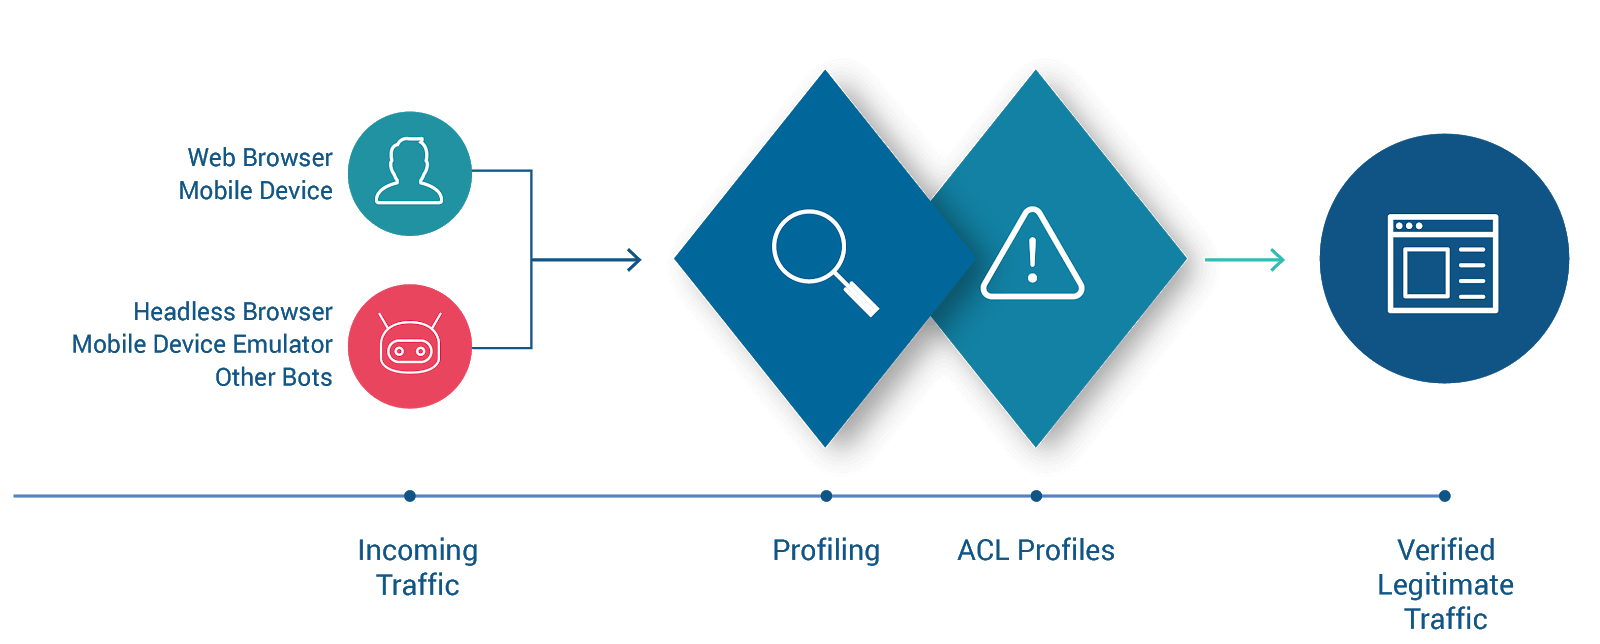
On the left are traffic sources, generating HTTP requests. The requests’ intended destination is the web resource (the site, app, service, or API) at the far right. To get there, they must pass through Curiefense and withstand its scrutiny. Only legitimate traffic is allowed through to the protected resource.
The diagram illustrates two stages of Curiefense: Profiling and ACL Profiles. We’ll add more stages in a moment, but let’s discuss these two first.
When Curiefense receives a request, it attaches internal tags to it. The tags will be the basis of subsequent processing in the ACL Profiles.
At this stage, no security policies are being enforced. Curiefense is merely creating a comprehensive profile for this request, by attaching all tags that are applicable to it.
The tags have several sources:
Automatic generation: Curiefense generates many tags automatically. For example, every request receives tags containing its IP address, ASN, geolocation, and several others.
External feeds: You can subscribe Curiefense to multiple data feeds, and specify tags to be associated with them. For example, the Spamhaus project provides DROP and EDROP “drop all traffic” advisory lists of IP addresses and AS numbers, consisting of netblocks that are used by professional spam or cyber-crime operations (for dissemination of malware, trojan downloaders, botnet controllers, etc.). Curiefense can attach an appropriate tag (perhaps “spamhaus”) to every incoming request originating from one of these hijacked/leased IPs. You could also subscribe to a feed containing IP addresses currently being used by VPNs, and attach a “vpn” tag to requests originating from one of them. And so on.
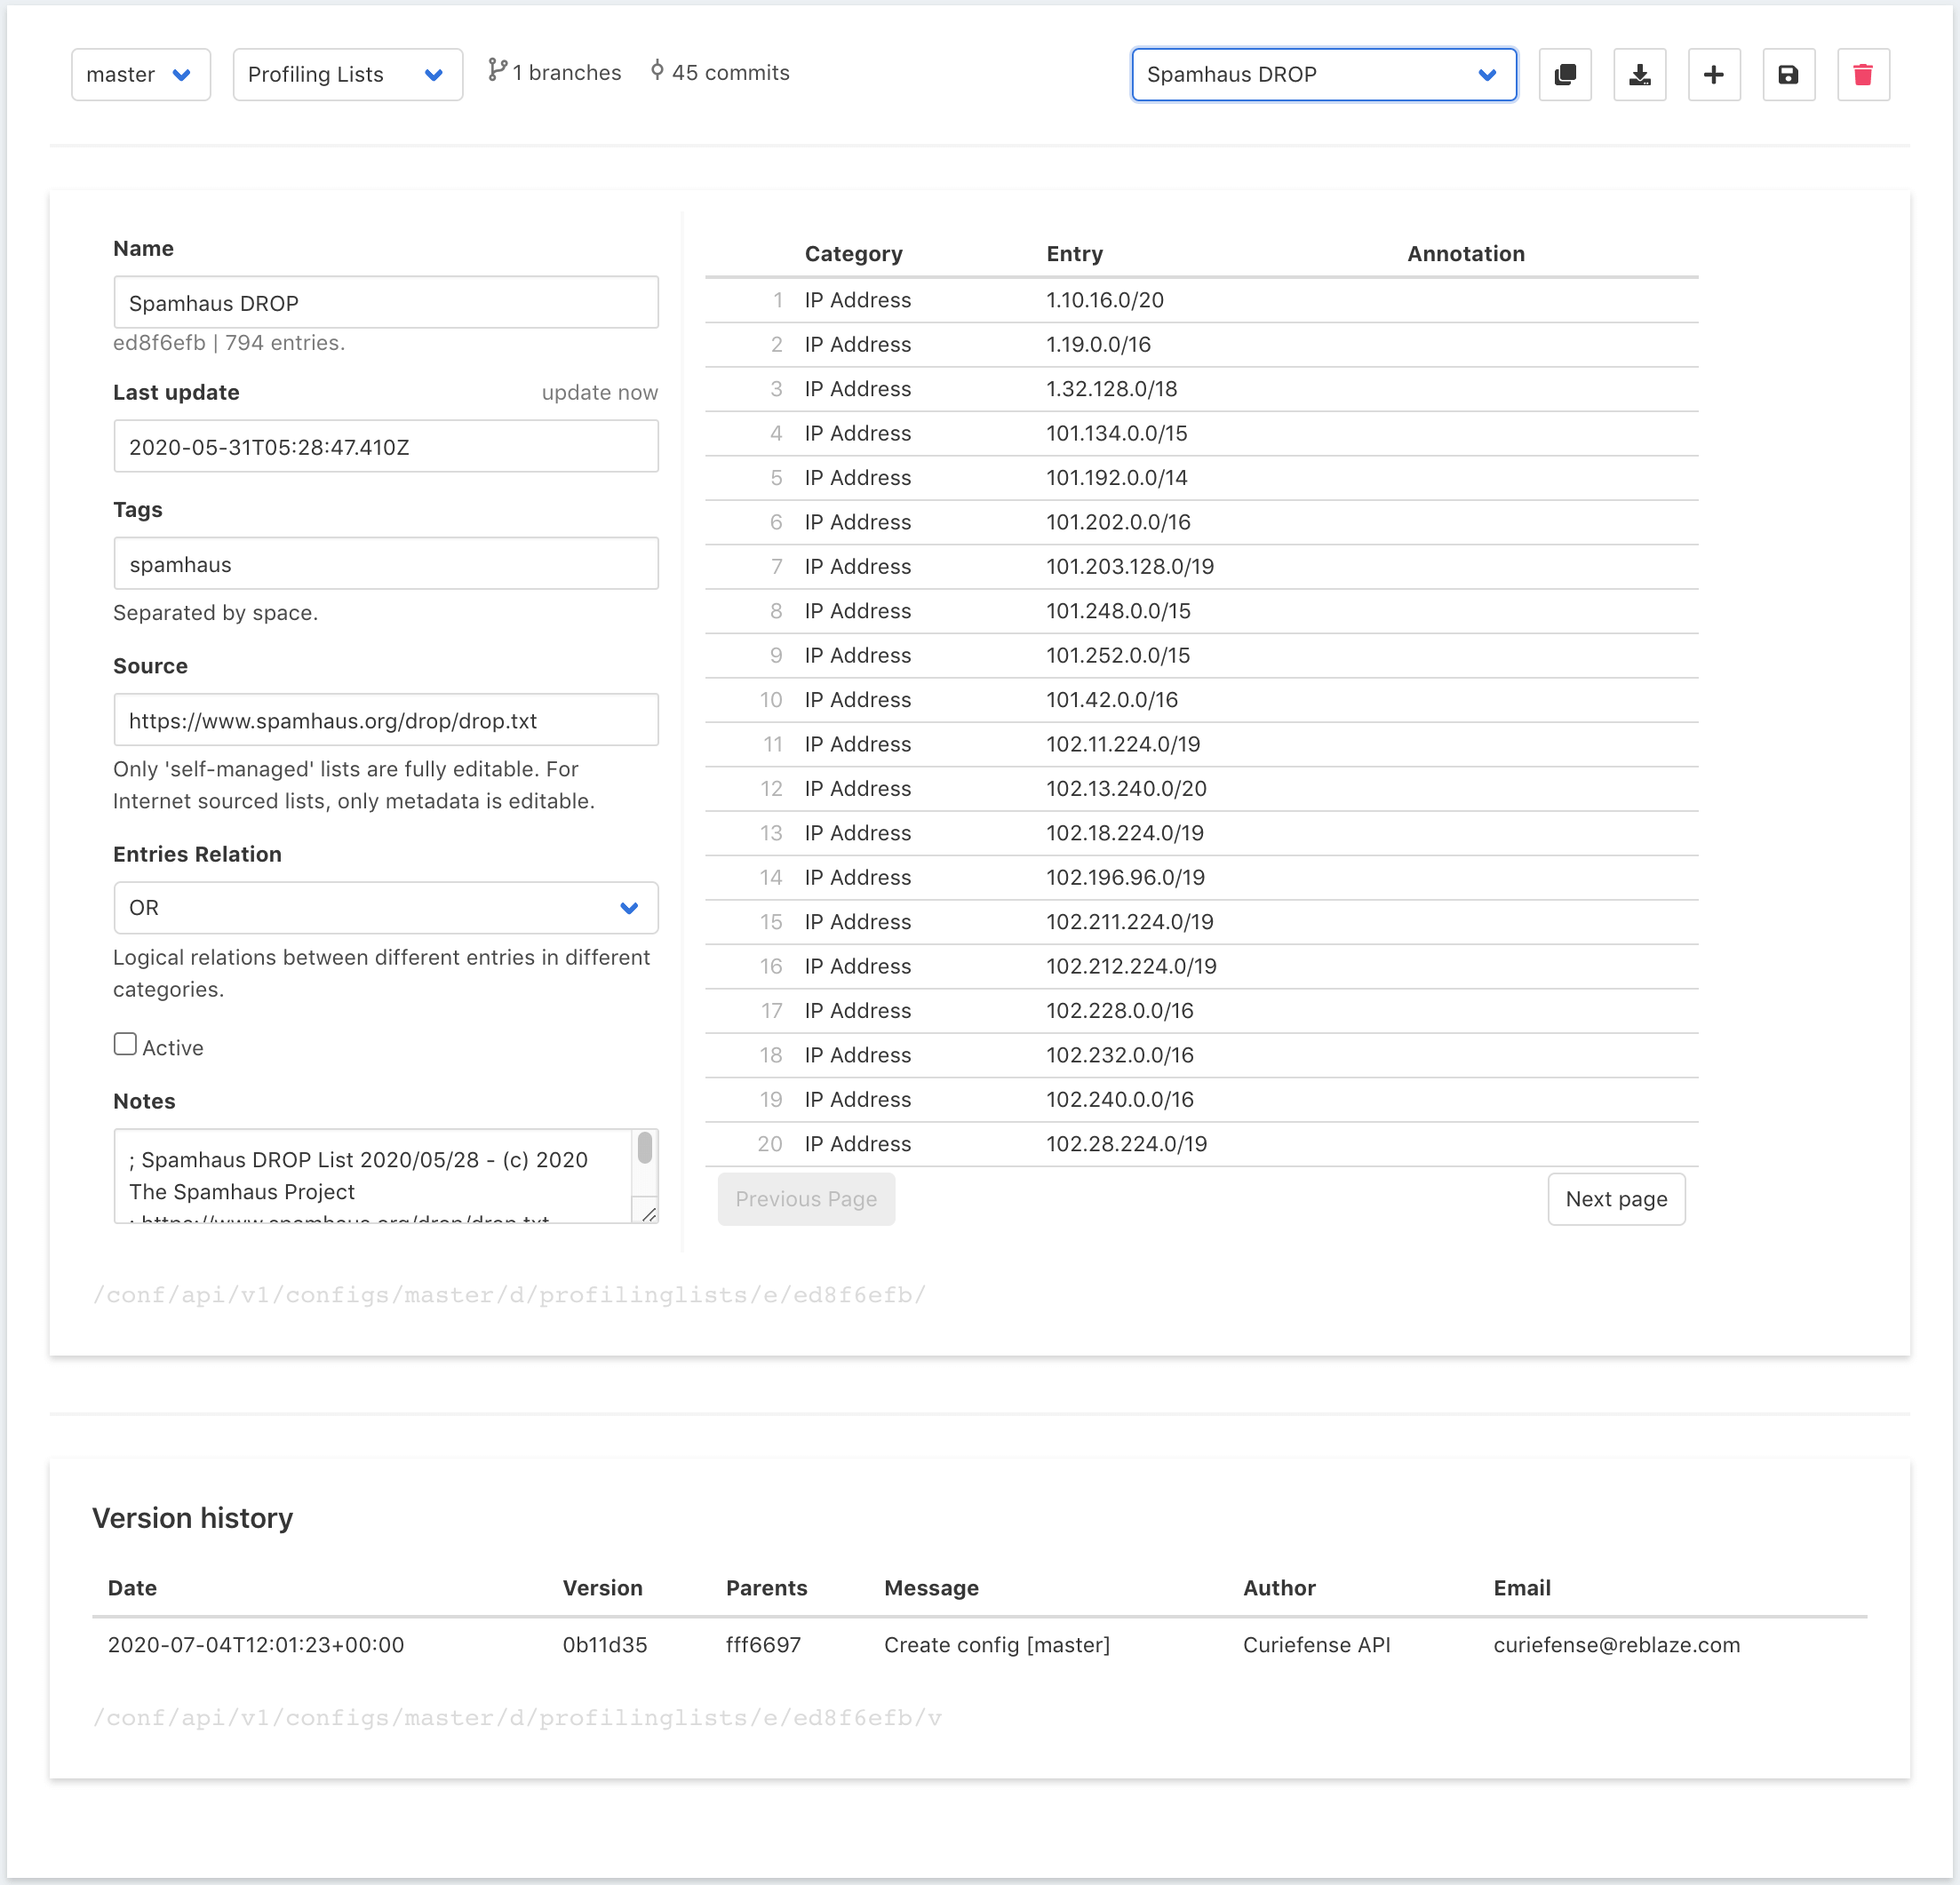
Out of the box, Curiefense includes a substantial number of preloaded lists. (Currently, there are 18; more will be added soon.) These are automatically updated each day.
Internal Profiling Lists: These are created by Curiefense administrators; they contain sets of criteria and the tags to attach when those criteria are matched. Some examples:
Profiling lists are a powerful tool. They allow you to define and attach tags depending on the content and characteristics of incoming requests: their headers, cookies, queries, paths, methods, geolocation, and more, with matching conditions specified as regex. For a full description, see the Curiefense documentation for Profiling Lists.
Once all tags are attached, it’s time to use them. That’s done with ACL Profiles.
Curiefense uses a request’s tags to enforce security policies. These are defined in an ACL (Access Control List) Profile. An ACL Profile defines the actions to take when certain tags are found, arranged in a sequential order.
Here’s an example in the Curiefense UI:

Tags are arranged in columns. The columns are evaluated from left to right; if a request matches a tag in a column, the action for that column is taken.
For the example above, this is how each request will be processed;
In the diagram above are two additional columns, which aren't used in this example. Their actions are:
A live deployment of Curiefense will usually have multiple ACL Profiles that are more extensive than the example described here, with different Profiles assigned to different paths/URLs throughout the protected application. Here’s a full explanation of ACL Profiles and their capabilities.
In the example, you probably noticed that ACL Profile actions often result in the request being sent to the WAF for further evaluation. WAF processing occurs after ACL Profiles, as shown here:
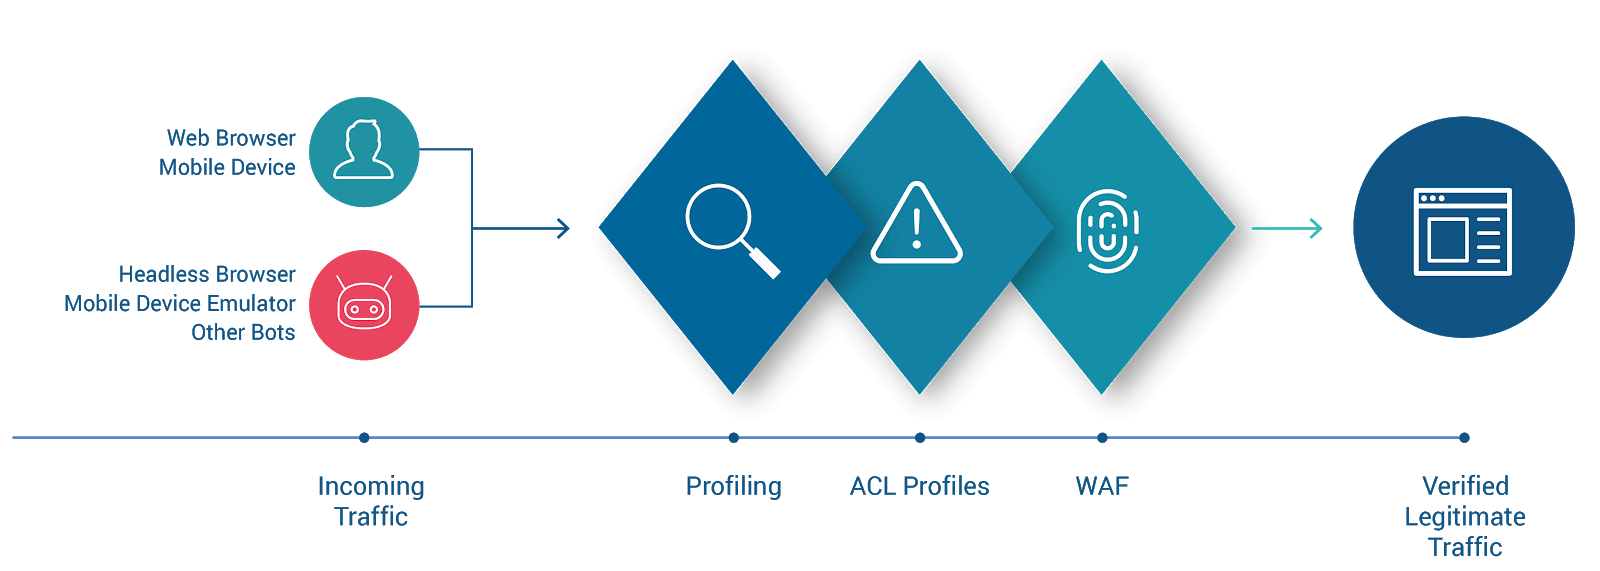
The Curiefense WAF enforces a number of rulesets, and blocks requests which do not meet them. This includes a wide variety of protective mechanisms against attacks such as SQL injection, code/command injection, cross-site scripting, and so on.
In addition, custom rulesets can be defined for any combination of headers, cookies, and arguments. This includes content filtering: a request can be blocked if it contains certain content, or conversely if it doesn’t contain certain content. A later article will cover the Curiefense WAF in more detail.
Now it’s time to complete the diagram by adding the one remaining stage of processing.
After tags are attached, but before ACL Profiles are evaluated, Curiefense enforces Rate Limits. These are rulesets which define the frequency and timing with which a traffic source is allowed to access a given resource.
This has many uses, including:
Rate Limiting rules are straightforward to set up, but they are quite powerful in their capabilities. A later article will explore Curiefense’s Rate Limiting capabilities in more detail.
This has been an overview of Curiefense’s real-time traffic processing. The main takeaway is this: Curiefense operates according to an intuitive tagging system. Each incoming request receives a set of tags describing its characteristics, and then the tags are evaluated to determine the action that is taken.
There are many more capabilities of Curiefense that we didn’t have a chance to discuss above; they will be covered in future articles. Stay tuned!
